Kubermatic on Hetzner
Hello and welcome to another article about Kubernetes. In this article we will go through the Kubermatic installation on Hetzner Cloud. But first of all let us go through a few questions:
What is Kubermatic and why do I need it?
Kubermatic abstracts different Kubernetes clusters and providers for you. It does not matter if you want a cluster on Amazon, Google, Hetzner, vSphere or on-premise. With Kubermatic you can easily bootstrap new clusters in your favorite location with your favorite cloud provider or on-premise. Furthermore, it comes with a few extras that are a hassle to maintain yourself, like monitoring or backups.
Why do I need multiple clusters?
This depends really on your setup, your company size, your reliability expectations and many more. The main idea behind having multiple clusters is reducing blast radius. Just imagine you are running your whole company on one cluster and this cluster drifts into a bad state. This would not be good, right? With multiple clusters you can reduce this blast radius and give every customer one dedicated cluster instead of one cluster for all customers. Just like Julius Caesar said: “Divide and conquer”.
Why Hetzner?
Hetzner is the cheapest cloud provider. I do not want to spend hundreds of Euros just for a blog article. Right now while writing this article the whole setup cost me under 1€. Moreover, Hetzner is investing heavy in their new cloud platform. Just recently they have added a new stateful firewall and loadbalancers.
Ready, Set, Go
The following article requires that you have installed a cluster with Kubermatic’s Kubeone tool on Hetzner. If you do not know how to do it or you just need a tutorial for this, have a look on my last article about it.
First I recommend that you unset your KUBECONFIG variable. I ran into some issues with my custom KUBECONFIG setup. Normally I construct my KUBECONFIG with some bash magic like this:
KUBECONFIG="$(find ~/.kube/configs/ -type f -exec printf '%s:' '{}' +)"
This allows me to store all my kubeconfigs in the directory $HOME/.kube/configs and gives me benefit that I do not need to merge them.
However, with Kubermatic (especially the kubermatic installer, I ran into some issues with it). So, if you see an “unauthorized” error,
while installing kubermatic this might be the issue for it. By the way, the issue is being tracked in: https://github.com/kubermatic/kubermatic/issues/7093
So much about the kubeconfig. Let us talk about the installation process itself now. You will need the kubermatic-installer. I recommend the community edition for doing your first steps with Kubermatic:
curl -L -O https://github.com/kubermatic/kubermatic/releases/download/v2.16.10/kubermatic-ce-v2.16.10-linux-amd64.tar.gz
Just unpack the archive (tar xfvz kubermatic-ce-v2.16.10-linux-amd64.tar.gz ) and then have a look on the
examples folder. In this folder you will see three files:
- kubermatic.example.ce.yaml
- seed.example.yaml
- values.example.yaml
The kubermatic.example.ce.yaml file defines your domain for the ingress, TLS certificates and authentication settings.
Some of these authentication settings must be the same in your values.example.yaml, hence make sure to validate
that you paste the same token there. The comments guide you through the configuration.
One problem I encountered has been the ClusterIssuer. I just went with the letsencrypt-staging ClusterIssuer, forgetting
that my domain has HSTS (HTTP Strict Transport Security) configured.
It will probably make sense to set this directly to letsencrypt-prod, otherwise you have to manually delete certificates and/or
certificaterequests after switching to the production ClusterIssuer (kubectl delete certificate ..., kubectl delete certificaterequest ...).
This applies to the dex and the kubermatic service. The dex service provides the authentication layer for your Kubermatic installation. With dex
it is possible to use Github, Microsoft AD, LDAP or any other provider for authentication.
For a first setup you need to configure the kubermatic.example.ce.yaml and the values.example.yaml file. I can highly recommend
the Kubermatic documentation. It gives you nice hints and leads you through the process: https://docs.kubermatic.com/kubermatic/v2.16/installation/install_kubermatic/.
If done, we can finally deploy Kubermatic into our Kubeone provisioned cluster on Hetzner. Note, I mentioned that kubeconfig problem earlier. I have disabled
the KUBECONFIG variable via unset KUBECONFIG, thus I have to set the kubeconfig path manually as parameter in the kubermatic-installer command:
./kubermatic-installer deploy --config examples/kubermatic.example.ce.yaml --helm-values examples/values.example.yaml --storageclass hetzner --kubeconfig ~/.kube/config
Moreover, it is important to select the correct storage class. On hetzner this is hetzner. This may change with your cloud provider.
A successful first run should look like this:
❯ ./kubermatic-installer deploy --config examples/kubermatic.example.ce.yaml --helm-values examples/values.example.yaml --storageclass hetzner --kubeconfig ~/.kube/config
INFO[16:50:37] 🛫 Initializing installer…                     edition="Community Edition" version=v2.16.10
INFO[16:50:37] 🚦 Validating the provided configuration…
WARN[16:50:37]    Helm values: kubermaticOperator.imagePullSecret is empty, setting to spec.imagePullSecret from KubermaticConfiguration
INFO[16:50:37] ✅ Provided configuration is valid.
INFO[16:50:38] 🧩 Deploying kubermatic stack…
INFO[16:50:38]    💾 Deploying kubermatic-fast StorageClass…
INFO[16:50:38]    ✅ StorageClass exists, nothing to do.
INFO[16:50:38]    📦 Deploying nginx-ingress-controller…
INFO[16:50:38]       Release is up-to-date, nothing to do. Set --force to re-install anyway.
INFO[16:50:38]    ✅ Success.
INFO[16:50:38]    📦 Deploying cert-manager…
INFO[16:50:38]       Deploying Custom Resource Definitions…
INFO[16:50:39]       Deploying Helm chart…
INFO[16:50:39]       Release is up-to-date, nothing to do. Set --force to re-install anyway.
INFO[16:50:39]    ✅ Success.
INFO[16:50:39]    📦 Deploying Dex…
INFO[16:50:40]       Release is up-to-date, nothing to do. Set --force to re-install anyway.
INFO[16:50:40]    ✅ Success.
INFO[16:50:40]    📦 Deploying Kubermatic Operator…
INFO[16:50:40]       Deploying Custom Resource Definitions…
INFO[16:50:40]       Deploying Helm chart…
INFO[16:50:40]       Release is up-to-date, nothing to do. Set --force to re-install anyway.
INFO[16:50:40]    ✅ Success.
INFO[16:50:40]    📝 Applying Kubermatic Configuration…
INFO[16:50:41]    ✅ Success.
INFO[16:50:41]    📡 Determining DNS settings…
WARN[14:58:40]       Timed out waiting for the LoadBalancer service "nginx-ingress-controller/nginx-ingress-controller" to become ready.
WARN[14:58:40]       Please check the Service and, if necessary, reconfigure the
WARN[14:58:40]       nginx-ingress-controller Helm chart. Re-run the installer to apply
WARN[14:58:40]       updated configuration afterwards.
INFO[14:58:40] 🛬 Installation completed successfully. Thank you for using Kubermatic ❤
You may have noticed the last 5 lines. These lines state that the load balancer is not yet ready. If you investigate this manually you will see this:
❯ kubectl get svc nginx-ingress-controller -n nginx-ingress-controller
NAME                               TYPE           CLUSTER-IP     EXTERNAL-IP   PORT(S)                      AGE
service/nginx-ingress-controller   LoadBalancer   10.97.231.63   <pending>     80:31765/TCP,443:30441/TCP   6m34s
This is because Kubermatic fails to provision the load balancer on Hetzner. You can fix this via adding an anotation to the
nginx-ingress-controller: kubectl annotate service/nginx-ingress-controller -n nginx-ingress-controller load-balancer.hetzner.cloud/location=fsn1 (Note: change the location according to your datacenter).
With this change you should see a new LoadBalancer resource popping up in your Hetzner Cloud UI or via hcloud load-balancer list:
❯ hcloud load-balancer list
ID       NAME                               IPV4           IPV6                   TYPE   LOCATION   NETWORK ZONE
314817   master-lb                          49.12.22.127   2a01:4f8:c011:39b::1   lb11   fsn1       eu-central
314842   af0c41dbc2fab40699aa92d233a76233   49.12.20.106   2a01:4f8:c011:18a::1   lb11   fsn1       eu-central
(The one with the random name is our provisioned load balancer for the ingress). How does this work? This works via the Hetzner cloud controller manager. More information about this here: https://github.com/hetznercloud/hcloud-cloud-controller-manager/blob/master/docs/load_balancers.md.
If done, I recommend a new run with the kubermatic-installer:
❯ ./kubermatic-installer deploy --config examples/kubermatic.example.ce.yaml --helm-values examples/values.example.yaml --storageclass hetzner --kubeconfig ~/.kube/config
INFO[15:39:42] 🛫 Initializing installer…                     edition="Community Edition" version=v2.16.10
INFO[15:39:42] 🚦 Validating the provided configuration…
WARN[15:39:42]    Helm values: kubermaticOperator.imagePullSecret is empty, setting to spec.imagePullSecret from KubermaticConfiguration
INFO[15:39:42] ✅ Provided configuration is valid.
INFO[15:39:43] 🧩 Deploying kubermatic stack…
INFO[15:39:43]    💾 Deploying kubermatic-fast StorageClass…
INFO[15:39:43]    ✅ StorageClass exists, nothing to do.
INFO[15:39:43]    📦 Deploying nginx-ingress-controller…
INFO[15:39:46]    ✅ Success.
INFO[15:39:46]    📦 Deploying cert-manager…
INFO[15:39:46]       Deploying Custom Resource Definitions…
INFO[15:39:46]       Deploying Helm chart…
INFO[15:39:51]    ✅ Success.
INFO[15:39:51]    📦 Deploying Dex…
INFO[15:39:55]    ✅ Success.
INFO[15:39:55]    📦 Deploying Kubermatic Operator…
INFO[15:39:55]       Deploying Custom Resource Definitions…
INFO[15:39:55]       Deploying Helm chart…
INFO[15:39:55]       Re-installing because --force is set…
INFO[15:39:57]    ✅ Success.
INFO[15:39:57]    📝 Applying Kubermatic Configuration…
INFO[15:39:57]    ✅ Success.
INFO[15:39:57]    📡 Determining DNS settings…
INFO[15:39:57]       The main LoadBalancer is ready.
INFO[15:39:57]
INFO[15:39:57]         Service             : nginx-ingress-controller / nginx-ingress-controller
INFO[15:39:57]         Ingress via IP      : 49.12.20.106
INFO[15:39:57]
INFO[15:39:57]       Please ensure your DNS settings for "cluster.shibumi.dev" include the following records:
INFO[15:39:57]
INFO[15:39:57]          cluster.shibumi.dev.    IN  A  49.12.20.106
INFO[15:39:57]          *.cluster.shibumi.dev.  IN  A  49.12.20.106
INFO[15:39:57]
INFO[15:39:57] 🛬 Installation completed successfully. Thank you for using Kubermatic ❤
This means our setup is ready. You should be able to login into Kubermatic now via the configured base domain. In my case that is cluster.shibumi.dev.
The dex installation can be found on dex.<base domain> (if configured).
For your first steps in the UI you need to configure a project, then you can create a cluster but wait… there are no cluster providers, right?
This is intended. You need to configure a seed cluster and the corresponding container storage interface (CSI) first. On smaller setups, like this one, we can use the master cluster
as seed cluster. Do you remember the seed.example.yaml file in the kubermatic examples directory? This is where we go next.
Modify the file according to the comments:
- Create a base64 encoding of your master kubeconfig:
base64 -w0 ~/.kube/config - Paste the output into the first secret in the
seed.example.yaml. - Modify the seed resource.
In the seed resource we have to specify our datacenters. We are using Hetzner, hence the configuration should look like this:
apiVersion: kubermatic.k8s.io/v1
kind: Seed
metadata:
  name: kubermatic
  namespace: kubermatic
spec:
  # these two fields are only informational
  country: DE
  location: Falkenstein

  # List of datacenters where this seed cluster is allowed to create clusters in
  # In this example, user cluster will be deployed in eu-central-1 on AWS.
  datacenters:
    hetzner-fsn1:
      location: Falkenstein 1 DC 8
      country: DE
      spec:
        hetzner:
          datacenter: fsn1-dc8
  # reference to the kubeconfig to use when connecting to this seed cluster
  kubeconfig:
    name: <name of your kubermatic master kubeconfig secret. For example kubeconfig-hetzner>
    namespace: kubermatic
As last step apply the new seed.example.yaml: kubectl apply -f seed.example.yaml.
With the new seed cluster we can deploy the Hetzner CSI driver.
For the Hetzner CSI driver we have to create a secret:
# secret.yml
apiVersion: v1
kind: Secret
metadata:
  name: hcloud-csi
  namespace: kube-system
stringData:
  token: YOURTOKEN
Deploy this secret via kubectl apply and continue with installing the Hetzner CSI driver:
kubectl apply -f https://raw.githubusercontent.com/hetznercloud/csi-driver/v1.5.1/deploy/kubernetes/hcloud-csi.yml
Note: Make sure to have a look on their version compatibility matrix.
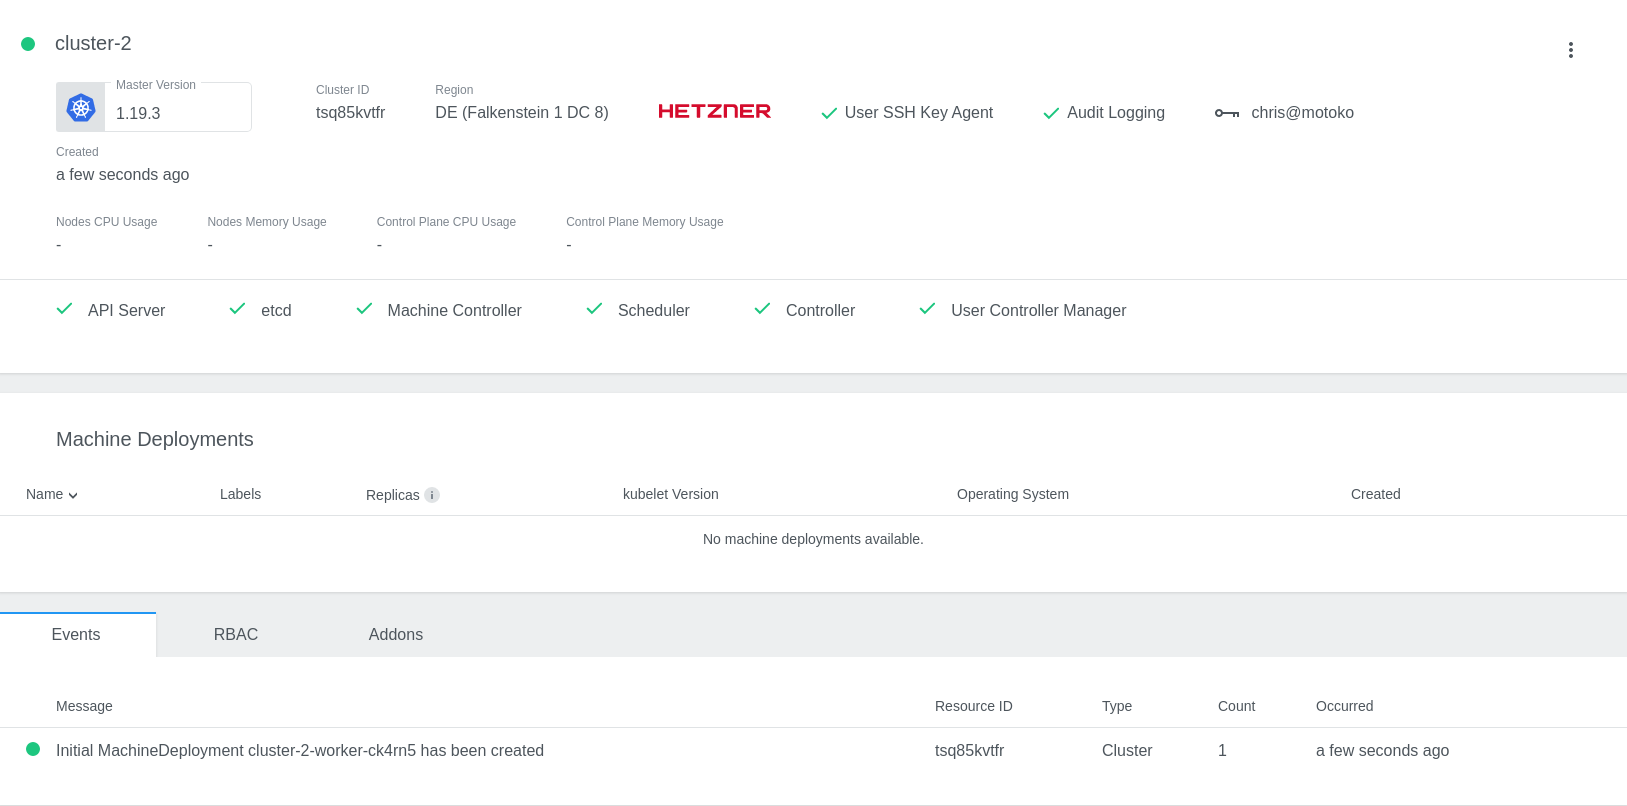
Now you should be able to
select a provider in your Kubermatic installation. Click through the Kubermatic “Create a cluster”-dialog.
If this fails, this might be because you are lacking nodes. Just scale up your master cluster with additional worker nodes.
I recommend doing it via the kubeone.yaml + kubeone apply (declarative setup), but you can just do it imperative as well
via: kubectl scale -n kube-system machinedeployment master-pool1 --replicas=2.
Congratulations! You have just created your first Kubernetes cluster via Kubermatic on Hetzner Cloud: